A well-designed landscape is an attractive addition to your home. Besides adding curb appeal, it can have several other benefits.
Contrast is important in landscape design. Different plant heights, colors, textures and leaf structures add depth to your design. Repetition can also highlight certain elements like lines in the landscape. Contact Landscaping Springdale AR for professional help.
One of the primary goals of landscape design is to create visual attraction. This involves a careful balance of color, line, form, scale, and texture. It also includes the use of transition elements to guide the eye in a natural way through your outdoor space. In addition, the use of lighting helps to draw attention to particular areas and enhance the overall look of your landscape.
The earliest forms of landscape were designed to produce aesthetic pleasure in humans. While this may seem simple, it is more complex than it seems. It requires a comprehensive understanding of the emotional, philosophical and psychological implications. It must be approached in a holistic manner, rather than as a collection of individual features and esthetic preferences.
Aesthetic desirability and pleasurable positive memorability are the result of a human assessment of all dualistic variables on a spectrum of possibilities. This assessment is influenced by a number of factors including age, gender, culture, education, intelligence and past experiences. It can be consciously or subconsciously made, objectively or subjectively.
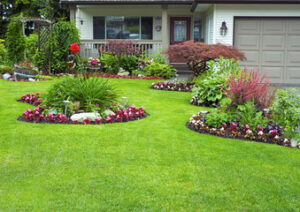
While some designers focus on the individual components of a landscape, others are concerned with creating a sense of harmony and balance. A balanced landscape is achieved by utilizing a combination of hardscape and softscape elements, which combine the non-living and living parts of your outdoor space. These include hard materials, such as pavers, patios and walkways, with the plant material, such as trees, shrubs and flowers. It is important to include a mixture of colors, textures and heights to achieve a balance that complements your home.
Line is an essential element in landscape design, which consists of straight or curved lines and can be symmetrical or asymmetrical. Symmetrical lines are formal and forceful, while asymmetrical lines have a more natural character. Lines can also be characterized by their speed and direction. Faster lines move the eye faster, while slower lines create a rhythm.
Texture is a very important element in landscape design, and it can be found in many different types of objects and materials. It can be coarse or fine, smooth or rough, and even heavy or light. In landscape design, texture is used to emphasize a particular aspect of the garden. For example, a textured bark can highlight the verticality of a tree.
Increased Property Value
A well-maintained landscape is a great way to increase your home’s value. This is because it provides a first impression that will attract potential buyers. In addition, it will help you to stand out from the competition and get more offers on your property. The best part is that you don’t need to invest a lot of money into your landscaping. You can simply trim bushes and trees, rake leaves, add mulch, and discard any debris on your property.
In addition, the use of proper lighting can also improve your property’s appearance. It can create shadows around structures and reduce the impact of harsh sunlight. This can also protect your house from excessive heat in the summer and frost in the winter. Properly placed plants and trees can also reduce energy costs by shading your home from the sun and blocking cold air drafts.
Landscaping is one of the most cost-effective ways to increase your home’s value. In fact, it is considered by real estate professionals to be one of the most important aspects of a home’s curb appeal. A well-manicured yard can increase your property’s value by up to 12%.
However, it is important to remember that your landscaping should be tailored to the specific needs of your home. This will ensure that it is aesthetically pleasing, easy to maintain, and matches your budget. For example, a smaller home may benefit more from a simple patio with a pre-fabricated grill island unit, while a larger home would see a greater return on investment with a custom outdoor kitchen and pavilion.
In addition to increasing your property’s value, landscaping can also lower your energy costs, improve the quality of your home’s air, and provide a place for relaxation and entertainment. As a result, it is an excellent choice for homeowners looking to make an investment in their homes. However, a well-designed and maintained landscape can be an excellent addition to any home.
Increased Value of the Home
A well-designed and maintained landscape can significantly increase a home’s value. This is because potential buyers will be able to see themselves living in the yard and enjoy all that it has to offer. It also increases the overall appeal of the property, which can make it easier to sell in the future. In addition, a landscape can help to lower energy costs by shading things that would otherwise absorb heat, such as buildings and concrete.
Landscaping can be divided into two broad categories – hardscaping and softscaping. The former refers to any non-living elements of the landscape such as pavers, patios, walkways and walls. The latter consists of the more organic components such as trees, shrubs, flowers and lawn. Landscaping can be done in a variety of ways, from simple garden beds to intricate water features and fire pits. It can even include structures such as pergolas and arbors.
In addition to making a property more attractive, landscaping can also benefit the health and wellbeing of the homeowners. Studies have shown that spending time in nature can reduce stress levels, increase mental clarity and even promote physical activity. A beautifully landscaped yard can encourage the use of outdoor space for recreational activities such as gardening, playing with kids and pets, and simply relaxing.
As a result, homeowners who regularly maintain their landscapes tend to have a higher quality of life. In addition, a landscape can provide a number of environmental benefits such as reducing carbon dioxide levels, creating habitat for wildlife and providing food for birds.
Lastly, landscaping can also improve the soil quality by preventing erosion and retaining moisture. This is achieved by incorporating elements like mulch, compost and aeration. Aeration involves the removal of small cores from the lawn, which helps to eliminate thatch, loosens the soil and allows the grass to get more water and nutrients.
If you’re considering a landscaping project, it’s important to hire professionals who have the experience and knowledge to do the job properly. A professional can help you design the perfect landscape for your property and ensure that it is properly maintained over time.
Reduced Stress
A well-designed landscape not only looks beautiful but provides a sense of tranquility. This is especially true for public spaces like parks and gardens. In fact, research shows that contact with nature reduces stress and anxiety. This is because plants have a calming effect and can help people find balance and peace. Landscaping can be a way to connect with nature and promote wellness in both residential and commercial spaces.
In addition, a beautiful landscape can encourage physical activity. Walking through a garden or even just viewing a green space can lead to a lower blood pressure and increase cognitive function. This can also help improve mood and combat depression.
Creating an inviting outdoor space can also foster community and social interaction. Studies have shown that people who live in communities with beautifully designed outdoor spaces are more likely to interact with their neighbors, which can help fight feelings of loneliness and isolation.
There are also practical benefits of landscaping, including the use of natural resources and reducing environmental waste. Using native plants can help reduce the need for chemical fertilizers and pesticides. This is because these plants are adapted to the local environment and can thrive without the need for excessive amounts of chemicals. Additionally, the addition of trees and shrubs can help reduce air pollution by absorbing carbon dioxide and releasing oxygen.
In short, a landscape can be a mini-ecosystem. The presence of flowers, trees, and shrubs can attract pollinators and contribute to biodiversity. In addition, the use of proper irrigation systems can prevent soil erosion and improve water quality.
The best part is that anyone can benefit from the positive effects of landscaping. Even if you don’t have a yard, you can plant a container garden on your balcony or patio to experience the therapeutic benefits of gardening. It is a great stress reliever to dig in the dirt, watch things grow, and enjoy the fruits of your labor. In addition, you can create an inviting outdoor space for your family and friends to enjoy, which is a wonderful way to spend time together.